Friday, October 30, 2009

Make: Nutty Squirrel Costume

I am sitting here typing with scorched knuckles from the glue gun. I rue the day I didn't take more home ec classes as a kid! I would have never attempted this had it not been for Designing Mom Betsy and her retrospective gallery of brilliant costumes for her son. Or Shinmin's amazing octopus creation and those very words that I could not shake, "I can't deny Mila her first Halloween." While it's not the "nuttiest" squirrel costume on the block, I hope that one day my boy will look back and appreciate his mom's efforts...scorched knuckles and all!

Warning: I kind of found my way through this project so I don't have any templates. As you can see above, the vest needs to be finished in a major way and I plan to go back and seam the edges with the green polka dot fabric.
For materials, you'll need:
-felt pieces
-fur pelt fabric
-old sweater
-glue gun
-batting/stuffing
-thread and needle
-velcro


To make the hat: It was too late to order the cute "June Bride" Etsy hat I wanted. So I took one of my hubby's old, moth-eaten sweaters and cut off the middle section of the sleeve. I sewed it into a beanie hat and rolled the edges.

With the extra felt I had, I rolled it into a twig and glued some leaves onto the branches. For ears I used the same felt.

The squirrel tail was made of this fun fur that I found at the fabric shop. I've seen this used quite often for stuffed toy animals and thought it'd be perfect for the baby. I cut out a triangular/wedge shape and used the glue gun to seam the edges. After stuffing it with batting, I rolled the tail into a "question" mark shape and sewed it into place. I attached it with velcro strips that adhere to his fur pelt vest.


Every nutty squirrel's gotta have his own accessories right? I made a "twig bottle cozy" out of the remaining cuff of the old sweater and the felt scraps.

I tried my hand at some acorns. I failed miserably ...just take a look at the green one that resembles more of a mushroom or moldy jalepeno! I plan to have a go at it again and create smaller ones like the yellow topped version.

And there you go. My little nutty squirrel is all set for his first Halloween. We have a Halloween staff meeting at the studio today so if you're on Polk Street be sure to stop by and crash it!

Happy Friday and Happy Halloween everyone!

Thursday, October 29, 2009

Our Projects: What's in My Sketchbook

If we're not emptying the contents of our bags for all to see, then we're peeking into each other's sketchbooks. But that's what I love about the Designing Mom group projects...it's share and share alike! Continuing today with our series of behind-the-scenes-sketchbooks is "Make" contributor Dana. I think her sketches for her Plumtree Studio tees are just as whimsical as the finished products themselves!


Decorate: Halloween

I just wanted to add in some quick last minute Halloween decor ideas for any of you planning a little spook party this weekend! We'll be heading to some Halloween parties that require costumes and Shinmin and her amazing octopus costume have convinced me I need to at least try my hand at making one for my baby. I told her I feel like failure is imminent but I am hoping I at least get some credit for trying. Any quick and easy ideas that I can pull together from leftover felt and a shaggy pelt from home-HELP?! I'll try and post my efforts tomorrow... even if it's a total shipwreck!


Boo Design blocks by The Bees Knees Designs

Candy corn pennants by Pam Wares

Boo cake toppers by Evie's Shop

Bat letterpress coasters by 12 Fifteen

Mouse silhouettes by Martha Stewart

Message in a bottle invites by Martha Stewart

Wednesday, October 28, 2009

Make: Crazy Octopus Costume

*Note from Cat:
I made a "Gahhh!" sound when I saw the Halloween costume Shinmin made for her baby Mila. Soooo brilliant! And hey, I told her she could now go as "Octomom."

What are all of your little ones are going to be Halloween? Share your pics with us!
.............................................


by Designing Mom Shinmin

With Halloween fast approaching and one of the busiest seasons at work, I had originally decided to skip Halloween this year. But yesterday morning, I woke up and looked at Mila and thought, “I can’t deny Mila her very first Halloween. “ Of course, my husband Kiril added more guilt by saying to me, “You’re creative, why don’t you just make her something? ”

So I immediately sprang into a DIY baby costume frenzy. What could I make with materials that I already have at home and complete the project in one afternoon? I only have one day off, so a quick project is key.

I decided to make Mila an octopus costume (an idea I borrowed heavily from the October issue of "Parents Magazine").

MATERIALS:


Four pairs of tights or socks. I used two baby tights and two pairs of adult knee and
thigh highs. I decided to use the light blue pair for Mila to actually wear and the others will be her 6 additional legs.


I found this belt laying around that my friend Marie brought back from Paris. I thought that the colourful rivets were perfect for the tentacle suction cups.


If you want to make this costume at home and you don’t happen to have a French belt with rivets, here is your chance to use up all those extra buttons that come with sweaters and jackets. I think using buttons will achieve a very fun DIY look. Of course, pieces of cut out round felt will work too.


I also used a
black ribbon, a long sleeve onesie, hot glue gun, lots of cotton balls, and a needle and thread.

STEPS:
First I cut the longer tights and socks to match the length of the actual tights Mila will be wearing.


I kept the waist top from the tights for a future project.


Then I cut the ends to a point and sewed the seams from the inside. Of course don’t alter the tights that your baby will wear.


Then I stuffed the 6 legs with cotton balls. I couldn’t find batting in the art supply store nearby (which would have been preferable) so I hand shredded a ton of cotton balls. After stuffing the tights and socks, I sewed up the tops to close the openings.

Next I cut all the rivets off the belt and kept the buckle for a future project.


I then hot glued all the rivets to the legs to create the suction cups. After cutting off the blue bows, I sewed the pieces onto the light blue tights because I didn’t want the hot glue to itch her les.

I used 8 rivets per leg and had two rivets left over.


Then I measured Mila’s waist to determine the length of ribbon needed. Her waist is 17”. Imagine having a 17” waist?

I used masking tape and mapped out the 17” on the ribbon and added about 10“ to each side of the 17” for a total length of 37”.


Next I sewed all the legs onto the ribbon making sure that the legs stayed within the 17” outlined by the masking tape.


Remember the waist top from the tights? I decided to turn it into a hat for this costume. I sew on a couple pieces of white felt and added the remaining two rivets for eyes. I pulled at the leg openings to curl it back slightly.


I dressed her in a black long sleeve onesie. This one is from Imps and Elfs. The buttons spell out "LOVE". Tie the ribbon around her waist, add the hat and voila! Crazy octopus!


Tuesday, October 27, 2009

Make: Halloween Garlands

*Note from Cat: As seen on MakeandTakes.com today, this is an incredibly fun "Make" project from Designing Mom contributor Amy at February 13 Creative. If you're looking for something to spruce up the house this week, this is a festive and easy project for you and the little ones!
.......................................................................


My girls are always trying to pull me away from the computer, and they love when it results in a craft project. Everywhere we turn it’s Halloween, so they were excited to decorate our house for the occasion. I thought up this twist on the classic children’s craft of paper doll chains. This one is fun and easy. It's even good for those with little patience. The results come fast!

Our festive Halloween garlands (bats, candy corn and ghosts):

What you will need:
11x17” white paper (for ghosts and candy corn)
20x25” black craft or construction paper (for bats)
orange and yellow crayons
black pen
scissors
tape


1. You will start by taking your 11x17 paper and accordion folding it. For the ghosts and candy corn your first fold should be 3.4” in, and each additional fold after that will also be 3.4”. You will end up with 5 panels. For the bats (on the black paper) cut a 4” wide strip lengthwise from your big sheet. Using this 4” x 25” strip of paper each fold should be 6.25” and you will have 4 panels. You could also use other sizes of paper and adjust fold sizes as needed.

2. Now using the template (above) you can trace the candy corn, the ghost, or the bat onto the top panel of your folded paper. Tip: You could trace right over the template applying pressure so that you create a path to follow when it’s time to cut, or you can cut out your shape and lay it on and trace around it.

3. It’s time to cut. Follow your lines and cut through all of your folded layers (careful not to cut your folded edges.)

4. Voila! Unfold and admire your little friends.

5. Decorate your ghosts with funny faces, and add color to your candy corn.

Additional tips: 1. Make two or more chains and tape them together to make a longer chain. 2. After you accordion fold your 11x17 paper you can cut it in half and you will have two folded panels ready to trace and cut! (see photos below)

Happy Halloween crafting!

Make and Takes

Oh yes...it's a cake (by Designing Mom Shinmin no less) and you can eat every last leaf off of it. Click here to visit MakeandTakes.com today where I'm guest posting more fall/Halloween themed projects from Designing Moms!

Monday, October 26, 2009

A Creative Life: Koko Gallery

Ania of Koko Gallery 
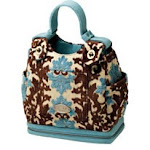
was introduced to me by a mutual friend who thought her work would be a great fit for my boutique. He was more than right--I had to fight temptation to keep some of her heartfelt work for myself! Some of my favorite organizational finds for a kid's room or nursery are Ania's wool felt baskets lined with printed basil or fruit. And how about a felt lined pencil or makeup case for a teacher's gift? Read on to find out more about what inspires Ania's work...


Tell us a little bit about your background


My name is Ania Witkowska. I studied history and art history in Poland. I taught at the high school level in Poland before emigrating to Ireland where I collaborated with well-known Irish poet Dave Lordan on a project, “Akavade and Machine,” that used prose and photographs to illustrate both real life and the life of the imagination on a newly built Irish housing estate.


Since coming to the United States I have traveled frequently with my life partner Joe to see the beautiful space and nature of this land. We both love travel and the shared experience of things around us. We are also very fond of bicycles and we try to cycle everywhere we can.


I have always loved creating things with my own hands and sharing my love of craft and design with everyone who appreciates things that are carefully made with a lot of thought and attention. I first began sewing when I was 11 years old. Making things with my hands really relaxes and rejuvenates me. In some way it is giving and taking.


How did Koko Gallery begin?


The designs of Lena Corwin inspired me to begin creating my own stamps and fabric prints. I used these fabrics to design and sew original gifts for my friends. They liked the gifts so much that they encouraged me to begin sharing my creations with other people. One friend, Petrina, invited me to her house for “sewing days”--a kind of group sewing party! Another friend, Agata, surprised me with a wonderful gift: a new sewing machine. And my partner, Joe, always believes in my art work and encourages my creativity. And here is the beginning of KOKO Gallery, where friends played an important role.


What's the inspiration behind your work?


Nature was always important for me: infinite forms and structures, variety of light, colors...

I was fascinated by French Impressionists in hight school and this led me to photography. I began looking for photographs showing the human touches in the objects and forms of everyday life. I strived to preserve the many images around me that showed the delicate structure of life.


Sewing and printing are a way for me to develop artworks that provide sensory reminders of the past--something delightful, soft and fragrant like basil, grapes, apples or garlic. I would like to touch people senses through my products, wake up their imagination through simplicity. I work with linen, felt, silk, cotton--all fabrics from nature.


Who are your favorite designers/artists?


The great masters always occupy an important space in mind: Michelangelo Buonarroti, Francisco Goya, Claude Monet, Henfi de Toulouse-Lautrec and Paul Gauguin. Frank Lloyd Wright and his emphasis on nature--like incorporating the outdoors into the indoors, or always building in harmony with nature by, for example, never placing a home on a hilltop “because then you take away the hilltop”--are ideas that constantly inspire me. I also admire the photographers E Atget, Ansel Adams, D. Arbus, J. Pierson, Tomasz Tomaszewski, T. Sikora...

Music also inspires my creativity.


What's a typical day-in-your-life at the studio?


I draw every product first and then I think about how to make it real. When the project involves a stamp, I carve it on rubber and affix it to a plastic board. Then I use a brush to place paint onto every part of stamp. Next is printing.


Some of my projects began in my mind during sleep. I wake up and I tell Joe all about my night dreams: lights, forms, pictures and artworks.

When I’m creating something, I never pay attention to time. I stay focused on my idea. Sometimes the results differ from my original idea and I like this too.


Creation is part of life. Life is creation.


Our Booklist: Sticky, Chewy...

The countdown to Halloween is on! Designing Mom Aya has two of her favorite recommendations from Chronicle Books for spooky, sticky, gooey books for the little ones.


1. (above) The title speaks for itself...Sticky, Chewy, Messy, Gooey Treats for Kids. The little meringue ghosts are easy goodies to make with the kids.


2. Great Pumpkins takes carving to another level. You've gotta love "Frosty the Skeleton"!
Related Posts with Thumbnails