Designing Mom Lori (of Fin + Roe) has the best wood floor redo I've seen. Talk about sunshine chic...I bet any guest can't help but smile when they walk into that room! Another big perk is it's an affordable project as well. Click here to to go to Lori's blog and read about the full redo.
Showing posts with label Lori. Show all posts
Wednesday, September 29, 2010
Wednesday, July 28, 2010
Best of Our Blogs: Anatomy 101
Designing Mom Lori is contributing today for our "Best of our Blogs" series. She has a great mid-week feature on her blog called "What He Said Wednesday..." and this is her all-time favorite. I laughed so hard...talk about teaching mom some anatomy 101!
from lori:
i secretly hoped that what i saw was just another piece of food that was lower in the mouse’s belly. however, in my heart, i knew what it really was. the fact that it seemed scribbled over made it even more certain for me. i called the little dude in to look at the artwork with me. i started easy by asking what the artwork was about. he showed me all the different food that he had drawn in the mouse’s belly….and that was it. i had to step it up and address the obvious. “so, this red piece down here….is that another piece of food?” the little dude looked up at me with a guilty look that confirmed my suspicions and quietly and shyly admitted, “no, that’s his junk”.
from lori:
every friday the little dude brings home a folder full of worksheets and artwork that he’s worked on throughout the week. this past friday was no exception. as i glanced through the packet i came across the usual worksheets and artwork. as i examined one of the worksheets more closely, i noticed something that didn’t seem quite right….
Labels:
best of our blogs,
Lori
Thursday, July 22, 2010
Happy Blogiversary
Be on the lookout for a new series called "Best of our Blogs" to highlight favorite posts of the Designing Mom's personal blogs and sites. And I invite you to share your blogs as well by sending in a link to your favorite posts ever (send to designingmoms@gmail.com)!
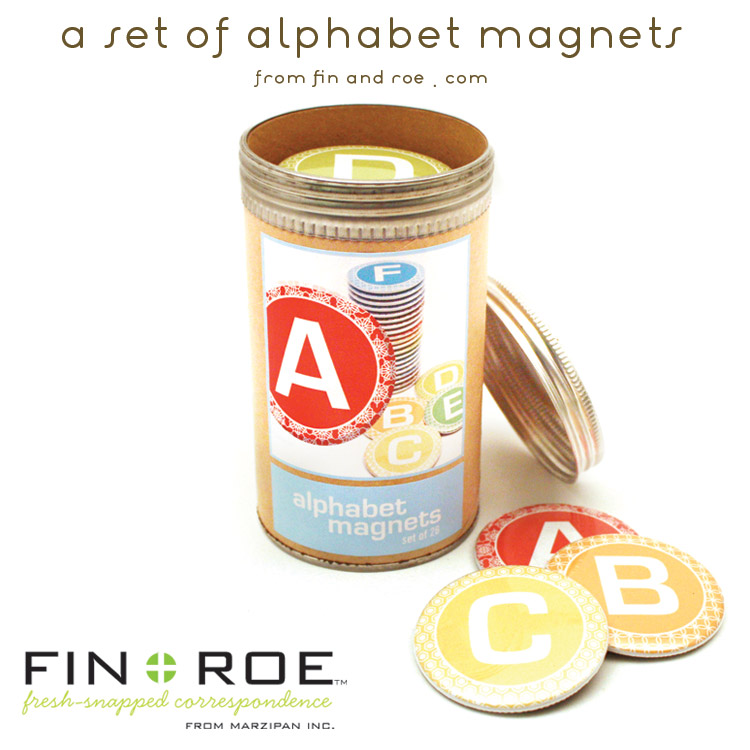
Speaking of blogs...I wanted to wish Designing Mom Lori of Fin + Roe a very happy Blogiversary! Her blog is five years in the running and she's doing a GREAT giveaway of one of her photographic prints, 5 Marzipan greeting cards, and a set of alphabet magnets (below)! Click here to enter.
Labels:
Bloggin' Birthdays,
Giveaways,
Lori,
mom blogs
Friday, June 18, 2010
Father's Day Fotos: Hanging with Dad
above: Designing Mom Lori's "boys" hanging out.
Labels:
Friday Fotos,
Lori
Monday, May 10, 2010
Make: Play Money
by Designing Mom Lori of Fin + Roe

last summer i got the boys a little cash register at a local garage sale. they love playing grocery store with it by using all their kitchen food toys. one boy gathers all the food they want to buy and the other does the check out process.
the register didn’t come with any money so they always just pretended. it also has a little area to slide a credit card through which sets off a series of beeps. the boys would always try to stick their fingers in the tiny slot for the credit card to make the beeps sound.
a couple weeks ago i decided it was time to make the register more “realistic”. so i took our change jar and some paper money with me down to my studio. my oldest helped me lay all the money and coins in my scanner and we scanned and printed them out at 50% so they would fit in the register drawer. i just used regular computer paper but should have backed the coins with some cardboard. it’s funny how real the money looks in this photo all crinkled up from use!

after we got the money all scanned in, i let each boy make their very own credit card to slide through the slot. i just took a thin piece of cardboard and glued paper to either side. both boys decorated with crayons and glitter.
i love these simple projects that cost practically nothing but brings so much joy to the boys. even if you don’t have a register, play money is always a fun thing for kids. quick tip: i picked up a couple wallets for the boys at the dollar store last year. they use it for their real money, but it would be a super cheap option for holding play money if you don’t have a register.

last summer i got the boys a little cash register at a local garage sale. they love playing grocery store with it by using all their kitchen food toys. one boy gathers all the food they want to buy and the other does the check out process.
the register didn’t come with any money so they always just pretended. it also has a little area to slide a credit card through which sets off a series of beeps. the boys would always try to stick their fingers in the tiny slot for the credit card to make the beeps sound.
a couple weeks ago i decided it was time to make the register more “realistic”. so i took our change jar and some paper money with me down to my studio. my oldest helped me lay all the money and coins in my scanner and we scanned and printed them out at 50% so they would fit in the register drawer. i just used regular computer paper but should have backed the coins with some cardboard. it’s funny how real the money looks in this photo all crinkled up from use!

after we got the money all scanned in, i let each boy make their very own credit card to slide through the slot. i just took a thin piece of cardboard and glued paper to either side. both boys decorated with crayons and glitter.
i love these simple projects that cost practically nothing but brings so much joy to the boys. even if you don’t have a register, play money is always a fun thing for kids. quick tip: i picked up a couple wallets for the boys at the dollar store last year. they use it for their real money, but it would be a super cheap option for holding play money if you don’t have a register.
Friday, April 16, 2010
Friday Fotos: Scene of the Crime
Designing Mom Lori of Fin + Roe always takes such wonderful photos and her recent one of son Fin led me to to her site where I saw the one below. That photo is all to familiar... Mine is only cruising but five minutes is all it takes to dismantle a laptop, empty out all contents of cereal box and shred tissue paper, important design sketches and receipts to bits...


Labels:
Friday Fotos,
Lori
Tuesday, February 16, 2010
Make: Octo-Dogs
by designing mom lori of fin and roe
i made a very special treat for the boys last night. i need to preface this by saying it wasn't my idea. i saw it on a blog or a magazine recently, but have no idea where. if you know, please let me know so i can give credit where credit is due.
ok. so we don't really eat hot dogs in our house very often. i might buy them once a year for the boys, but when i saw these i knew they'd get a kick out of them. i bought some turkey dogs to try to keep it a little healthier and got to work

i cut each dog into 4 pieces and then threaded 4 pieces of spaghetti through each one (so they'd have 8 legs when done).

just throw them in a pot of boiling water and boil like normal until the noodles are done. OCTO-DOGS! i served them up and the boys were in heaven. they thought they were the coolest things on the planet. the little dude even had a second helping which never happens. he was stoked when he found out there were left overs for today.
i made a very special treat for the boys last night. i need to preface this by saying it wasn't my idea. i saw it on a blog or a magazine recently, but have no idea where. if you know, please let me know so i can give credit where credit is due.
ok. so we don't really eat hot dogs in our house very often. i might buy them once a year for the boys, but when i saw these i knew they'd get a kick out of them. i bought some turkey dogs to try to keep it a little healthier and got to work

i cut each dog into 4 pieces and then threaded 4 pieces of spaghetti through each one (so they'd have 8 legs when done).

just throw them in a pot of boiling water and boil like normal until the noodles are done. OCTO-DOGS! i served them up and the boys were in heaven. they thought they were the coolest things on the planet. the little dude even had a second helping which never happens. he was stoked when he found out there were left overs for today.
Wednesday, January 6, 2010
Story: A Thrifty Holiday
by designing mom lori

after reading abby’s christmas recap it reminded me that i wanted to share our first thirfted christmas experience. way back when the weather was warm in wisconsin i spent every friday morning thrifting around town. it was my “me” time.. no kids, no work, just me and lots of cheap vintage goodies! it really became a way of life for me and my family. i decided early on in my thrifting adventure that i was going to try and do a totally thrifted christmas for my boys. (ages 5 and 2) they’re still young enough to not care that they’re getting “used” toys and since they outgrow them so fast it just made sense. the boys did occasionally come along with me on my adventures and so i prepared them for their thrifty christmas every time they asked for something at a sale. i’d say, “well, we’ll need to go home and write santa a list of all the things you see at these sales and then maybe he can get them for you for christmas.” and we did just that.

the big gifts of the year were two school desks that the boys happened to be with me when i found. fin, my older, begged for them. he sat in one and wouldn’t get out. they were an amazing steal at $5 each! yes, $5. they needed a little cleaning since the tops were covered with stickers, but otherwise in great vintage condition. i secretly let the man who was running the sale know that i wanted them and would be back. meanwhile i told fin he needed to add it to his list for santa while he begged all the way to the car.
i spent the summer collecting other gifts and was so excited about christmas. i had found so many goodies. that is, until i started wrapping the gifts. i started second guessing what i had done. would the boys like all these gifts? would they care that they were from garage slaes? what had i done to my boys? was i scaring them for life?
that feeling promptly left on christmas morning when they saw their desks and opened all their gifts with wide eyes and smiles. it didn’t matter what they got or where it was from. in fact, i think it made it more magical to them that santa actually read their letter and managed to get all these things that they had seen and written about. how in the world did he do that?

here are both the boys sitting in their desks opening the rest of their gifts (which they insisted on). you can see the huge stack of thrifted books they both got and the excitement in their faces. i think they each got approximately 15-20 books. something that would have cost a fortune if purchased new. i’m very particular when buying used books. they either have to be really cool with vintage artwork or new and high quality. i like to dig through to find things like caldecott winners etc. things that aren’t just garbage.
here you can see some of the other gifts....a little computer, a basketball game (where you try to shoot the ball from a lever and beat your opponent), a school bus (that is fought over often). these are just a few of the other things they received, there was much more yet to be opened. all in all i’d guess i spent less than $30. for EVERYTHING! their ENTIRE christmas. they got way more gifts than they normally would have if we had bought them new and enjoyed it just as much. in fact, my hubby expressed how he thought i bought too much on several occasions. it’s just too much fun when everything costs 25 cents or $1.00!
oh, and the best part of being thrifty? the toys are already out of their original packaging! that’s super great for 2 reasons. #1. less garbage to throw in the landfill, #2. spending our christmas morning playing instead of trying to get things out of all the overdone packaging these days!
will we do a thrifty christmas again? absolutely! will our kids know the difference or care? not for one second!

after reading abby’s christmas recap it reminded me that i wanted to share our first thirfted christmas experience. way back when the weather was warm in wisconsin i spent every friday morning thrifting around town. it was my “me” time.. no kids, no work, just me and lots of cheap vintage goodies! it really became a way of life for me and my family. i decided early on in my thrifting adventure that i was going to try and do a totally thrifted christmas for my boys. (ages 5 and 2) they’re still young enough to not care that they’re getting “used” toys and since they outgrow them so fast it just made sense. the boys did occasionally come along with me on my adventures and so i prepared them for their thrifty christmas every time they asked for something at a sale. i’d say, “well, we’ll need to go home and write santa a list of all the things you see at these sales and then maybe he can get them for you for christmas.” and we did just that.

the big gifts of the year were two school desks that the boys happened to be with me when i found. fin, my older, begged for them. he sat in one and wouldn’t get out. they were an amazing steal at $5 each! yes, $5. they needed a little cleaning since the tops were covered with stickers, but otherwise in great vintage condition. i secretly let the man who was running the sale know that i wanted them and would be back. meanwhile i told fin he needed to add it to his list for santa while he begged all the way to the car.
i spent the summer collecting other gifts and was so excited about christmas. i had found so many goodies. that is, until i started wrapping the gifts. i started second guessing what i had done. would the boys like all these gifts? would they care that they were from garage slaes? what had i done to my boys? was i scaring them for life?
that feeling promptly left on christmas morning when they saw their desks and opened all their gifts with wide eyes and smiles. it didn’t matter what they got or where it was from. in fact, i think it made it more magical to them that santa actually read their letter and managed to get all these things that they had seen and written about. how in the world did he do that?

here are both the boys sitting in their desks opening the rest of their gifts (which they insisted on). you can see the huge stack of thrifted books they both got and the excitement in their faces. i think they each got approximately 15-20 books. something that would have cost a fortune if purchased new. i’m very particular when buying used books. they either have to be really cool with vintage artwork or new and high quality. i like to dig through to find things like caldecott winners etc. things that aren’t just garbage.
here you can see some of the other gifts....a little computer, a basketball game (where you try to shoot the ball from a lever and beat your opponent), a school bus (that is fought over often). these are just a few of the other things they received, there was much more yet to be opened. all in all i’d guess i spent less than $30. for EVERYTHING! their ENTIRE christmas. they got way more gifts than they normally would have if we had bought them new and enjoyed it just as much. in fact, my hubby expressed how he thought i bought too much on several occasions. it’s just too much fun when everything costs 25 cents or $1.00!oh, and the best part of being thrifty? the toys are already out of their original packaging! that’s super great for 2 reasons. #1. less garbage to throw in the landfill, #2. spending our christmas morning playing instead of trying to get things out of all the overdone packaging these days!
will we do a thrifty christmas again? absolutely! will our kids know the difference or care? not for one second!
Wednesday, December 23, 2009
Tuesday, December 15, 2009
Make: Winning Stick
by designing mom lori
we’ve had a big problem around our house recently. our 4 year old fin (5, as of yesterday!), whined about everything. it was really starting to grate on our nerves and we realized we needed to nip it in the bud before it got worse.
after thinking about what we could do to discourage him from this behavior, this is what we came up with.
It’s called “the winning stick”. we let fin name it because we wanted him to connect to the idea. the premise behind it is that when you do good things, you move up the stick. when you do not-so-great things you move down. when you get to the top, you get a prize. (hence the choice of the name “winning stick”) for us, we let the kids choose the prize (with help), and it’s different every time. the first time it was a small toy. they were taken, by themselves, to the store as a special treat and could pick out a toy under $5. the second time it was an ice cream cone. we’re on our third round now. one piece of advice: start them off about 1/3 of the way up the first time. chances are there will be a lot of moving down until they get the concept. also, when they reach the top, we always re-start them about 5 spots from the bottom so there’s room if something not-so-great happens.
here’s a little bit about how i made ours in case you’re interested in doing something similar:

i made one clothes pin for each boy. i let them pick out their own colors and patterns. of course they wanted multiple colors so we did one color on each side of the clip. all i did was print out the images on my home printer and then cut them to size and mod podge them onto the clips. you could print out just about anything for this or even go to your local craft store and use scrapbook paper.

for the main stick, i started out with a dowel. i painted the whole thing in the apple green color. then i printed out more paper and cut it into 1” strips. i wrapped them around the dowel and used mod podge again to adhere them at 1” increments all the way up the dowel.
for hanging purposes (which you can see in the first image) i looped a piece of ribbon over the top and glued it to the sides of the dowel. i then took another piece of ribbon and wrapped it around the dowel to cover the end of the ribbon. i recommend hanging it at kid level so they can move up and down themselves.
so far this system is working well for us. if they’re not doing something we like we tell them to go move down the stick. if they do something great, we tell them to move up. if it’s super great, or vice versa we may tell them to move up/down 2 spots.
what do you use to help motivate your kids? share with us what works for you!
we’ve had a big problem around our house recently. our 4 year old fin (5, as of yesterday!), whined about everything. it was really starting to grate on our nerves and we realized we needed to nip it in the bud before it got worse.
after thinking about what we could do to discourage him from this behavior, this is what we came up with.
It’s called “the winning stick”. we let fin name it because we wanted him to connect to the idea. the premise behind it is that when you do good things, you move up the stick. when you do not-so-great things you move down. when you get to the top, you get a prize. (hence the choice of the name “winning stick”) for us, we let the kids choose the prize (with help), and it’s different every time. the first time it was a small toy. they were taken, by themselves, to the store as a special treat and could pick out a toy under $5. the second time it was an ice cream cone. we’re on our third round now. one piece of advice: start them off about 1/3 of the way up the first time. chances are there will be a lot of moving down until they get the concept. also, when they reach the top, we always re-start them about 5 spots from the bottom so there’s room if something not-so-great happens.here’s a little bit about how i made ours in case you’re interested in doing something similar:

i made one clothes pin for each boy. i let them pick out their own colors and patterns. of course they wanted multiple colors so we did one color on each side of the clip. all i did was print out the images on my home printer and then cut them to size and mod podge them onto the clips. you could print out just about anything for this or even go to your local craft store and use scrapbook paper.

for the main stick, i started out with a dowel. i painted the whole thing in the apple green color. then i printed out more paper and cut it into 1” strips. i wrapped them around the dowel and used mod podge again to adhere them at 1” increments all the way up the dowel.
for hanging purposes (which you can see in the first image) i looped a piece of ribbon over the top and glued it to the sides of the dowel. i then took another piece of ribbon and wrapped it around the dowel to cover the end of the ribbon. i recommend hanging it at kid level so they can move up and down themselves.
so far this system is working well for us. if they’re not doing something we like we tell them to go move down the stick. if they do something great, we tell them to move up. if it’s super great, or vice versa we may tell them to move up/down 2 spots.
what do you use to help motivate your kids? share with us what works for you!
Friday, October 23, 2009
Shop: Fresh Snapped Photos
Thought I'd close out the week with Designing Mom Lori's beautiful, vibrant photography and her new Etsy shop: Fresh Snapped Photos. Congrats Lori! Be sure to click here and visit.
Happy Friday and weekend everyone!


Happy Friday and weekend everyone!


Thursday, October 1, 2009
Make: Road Trip Sketchbook
by Designing Mom Lori
I recently read a post by Jan at Daisy Janie that i thought would be a good addition to my other post about how to keep kids entertained in the car on long trips.

Jan’s idea is so simple it’s like one of those “duh” moments. like, why didn’t I think of that? Here’s a portion of Jan’s post about the work seen above:
Thanks for sharing your great idea with us Jan! I know I’m going to try this on our next trip!
I recently read a post by Jan at Daisy Janie that i thought would be a good addition to my other post about how to keep kids entertained in the car on long trips.

Jan’s idea is so simple it’s like one of those “duh” moments. like, why didn’t I think of that? Here’s a portion of Jan’s post about the work seen above:
"We love passing doodles back & forth, where each person progressively adds a little somethin-somethin to the page. As we made it to the Oregon coast and back, this fantastical drawing emerged from our cooperative efforts. We both got pretty pumped to see what the other had added each time we got it back! I highly recommend this activity - you'll be pleasantly surprised by the joy your child gets from it!”What a brilliant idea to get creative in the car together! I think my favorite part of this project, beside the fact that it’s based on creativity, is the fact that it’s cooperative and that you’re interacting with one another on a level you may not ordinarily.
Thanks for sharing your great idea with us Jan! I know I’m going to try this on our next trip!
Friday, August 28, 2009
Friday Fotos: Rowan's Big 2!
Today's Friday Foto belongs to Lori. What an absolute cutie! After reading this, I am definitely going to try and get some extra cuddles over the weekend. Happy Friday and weekend everyone!
We'll see ya on Monday.

By Designing Mom Lori:
My baby, Rowan, the Roe of Fin+Roe is turning 2 on August 30th. It’s so hard to believe my baby is turning 2 already. Since he’s most likely our last, it makes it even harder to take. He’s been a rough and tumble boy from the very beginning and not much of a cuddle bug so it’s hard to give up the idea of not having a baby to cuddle. I always say that when they turn 2 they’re no longer babies, but I’m not sure i can ever give up calling him my baby no matter how old he is.
Happy, happy, birthday to my special little man. we love you so much!
We'll see ya on Monday.

By Designing Mom Lori:
My baby, Rowan, the Roe of Fin+Roe is turning 2 on August 30th. It’s so hard to believe my baby is turning 2 already. Since he’s most likely our last, it makes it even harder to take. He’s been a rough and tumble boy from the very beginning and not much of a cuddle bug so it’s hard to give up the idea of not having a baby to cuddle. I always say that when they turn 2 they’re no longer babies, but I’m not sure i can ever give up calling him my baby no matter how old he is.
Happy, happy, birthday to my special little man. we love you so much!
Labels:
Friday Fotos,
Lori
Monday, August 17, 2009
Fin + Roe Giveaway!
I ooohed and aaaahed when I saw these. Such a sentimental and stylish product! This week's giveaway comes from Designing Mom Lori of Fin + Roe. Her chic magnet mementos allow you to submit a photo of your choice and customize with your choice of color and pattern. And guess what...Lori is giving a lucky recipient a set of 12 customized magnet mementos!
To enter, just comment on which magnet memento you love the most (click here to visit). The giveaway ends Friday and readers and Designing Moms are welcome to enter. Goodluck!

To enter, just comment on which magnet memento you love the most (click here to visit). The giveaway ends Friday and readers and Designing Moms are welcome to enter. Goodluck!

Tuesday, July 21, 2009
In the News...
Design Sponge featured Designing Mom Lori's floors in their recent Before/After series. I couldn't believe how beautiful the finished effect was...just GLORIOUS!
And Lori is celebrating her 4 year "blogiversary" by doing a giveaway of some of her awesome Fin + Roe products. Click here to enter!

And Lori is celebrating her 4 year "blogiversary" by doing a giveaway of some of her awesome Fin + Roe products. Click here to enter!

Labels:
Decorate,
In the News,
Lori,
Make
Wednesday, July 8, 2009
A Creative Life
By Designing Mom Lori
How to make long car trips more peaceful.
My husband and I lived in Minneapolis before moving back to small town Wisconsin to raise our family. we try to get back at least once a year to see old friends. With two small kids, a 5-6 hour drive can be painful. One of the things we’ve found that our 4 year old loves is having a map of his own so he knows where we are and how much longer it will take to get there. No more “are we there yet?” from him! Works like a charm. here’s what we do:

We print out a map (try google maps) showing both our starting and ending points. then, we label points along the way and mark them 1-5 (feel free to add more if your trip is longer). Then, we label the route home with letters a-e. He also gets a set of small circle stickers which we staple to the corner of the map so there’s no possibility of losing them. Whenever we reach a major marker on the map, he gets to take a sticker off and place it over the corresponding point on the map.
This could be done in a variety of ways. instead of labeling with letters and numbers you could mark with physical landmarks that the kids can try to find on the way. On our latest map to Minneapolis, my husband drew a picture of our house at the starting point and then drew a lego in Minneapolis (our 4 year old had been looking forward to visiting lego land for months).
Get creative. have fun. enjoy your trip!
How to make long car trips more peaceful.
My husband and I lived in Minneapolis before moving back to small town Wisconsin to raise our family. we try to get back at least once a year to see old friends. With two small kids, a 5-6 hour drive can be painful. One of the things we’ve found that our 4 year old loves is having a map of his own so he knows where we are and how much longer it will take to get there. No more “are we there yet?” from him! Works like a charm. here’s what we do:

We print out a map (try google maps) showing both our starting and ending points. then, we label points along the way and mark them 1-5 (feel free to add more if your trip is longer). Then, we label the route home with letters a-e. He also gets a set of small circle stickers which we staple to the corner of the map so there’s no possibility of losing them. Whenever we reach a major marker on the map, he gets to take a sticker off and place it over the corresponding point on the map.
This could be done in a variety of ways. instead of labeling with letters and numbers you could mark with physical landmarks that the kids can try to find on the way. On our latest map to Minneapolis, my husband drew a picture of our house at the starting point and then drew a lego in Minneapolis (our 4 year old had been looking forward to visiting lego land for months).
Get creative. have fun. enjoy your trip!
Labels:
A Creative Life,
Lori
Wednesday, June 3, 2009
Our Booklist: The Incredible Book Eating Boy
by Designing Mom Lori
Being a designer, I love books that not only have a great story, but are also beautiful, inspiring and interesting to look at! the boys got a book this past Christmas from Santa that really fits all those criteria.
It’s called The Incredible Book Eating Boy by Oliver Jeffers.

The story is about a little boy named Henry who, by accident, starts eating books. he starts out slow by eating pages, but then ends up eating multiple books at a time. (red ones being his favorite)

He found that the more books he ate, the smarter he got!

He began eating multiple books in one sitting!

He was learning so much that he quickly became smarter than his teachers!

Then, one day, things started to get all jumbled up. Henry was eating too many books, too quickly. He couldn’t digest the information quick enough. Henry was feeling very sick.

Henry decided it was time to stop eating books. He thought about it and wondered if he started reading books if he would become just as smart. Henry picked up his books, read, and learned that he loved to read!

Now henry reads all the time! although every now and then......
Being a designer, I love books that not only have a great story, but are also beautiful, inspiring and interesting to look at! the boys got a book this past Christmas from Santa that really fits all those criteria.
It’s called The Incredible Book Eating Boy by Oliver Jeffers.

The story is about a little boy named Henry who, by accident, starts eating books. he starts out slow by eating pages, but then ends up eating multiple books at a time. (red ones being his favorite)

He found that the more books he ate, the smarter he got!

He began eating multiple books in one sitting!

He was learning so much that he quickly became smarter than his teachers!
Then, one day, things started to get all jumbled up. Henry was eating too many books, too quickly. He couldn’t digest the information quick enough. Henry was feeling very sick.

Henry decided it was time to stop eating books. He thought about it and wondered if he started reading books if he would become just as smart. Henry picked up his books, read, and learned that he loved to read!

Now henry reads all the time! although every now and then......
Tuesday, April 21, 2009
Make: Preserving Your Little One's Artwork
By Designing Mom Lori
The little dude created a piece of artwork in pre-school last year that I really loved. It's green and orange which happen to match the colors of our kitchen. The photos don't do it justice. i wanted to preserve this piece of artwork to display it over our eating bar area. I thought i'd share with you how we did it in case you'd like to do the same! please note that this can be done with any artwork and is a great alternative to framing a large piece of art like this one.
Here's the piece of artwork in question. as you can see it was done on really thin paper. Being that it was a watercolor type painting, it was very wrinkly. the one thing to keep in mind is that with thin paper like this, it will most likely get very wrinkly when applied to the canvas. If you're not ok with this, then this might not be the right solution for your piece of art. the nicer or thicker the paper, the less chance of wrinkling.

I started out by buying a canvas that would fit the particular painting. there wasn't a perfect size, but this one came pretty close. we only had to trim a small bit off the top of the artwork. (which was fine by me because his teachers wrote his name on the front of the painting! tsk, tsk!) I also bought mod podge (other glues/sealers will work as well), a small roller and tray. then we were ready to start.

One of the best things about this project is that it’s very simple to do, so it’s something the kids can join in on. it makes it more special when they see their artwork hanging, knowing that they helped.
Here's my son, Finley, rolling on the glue with his mini roller. You want to make sure you have a good thick layer of glue so it sticks well. once you have it covered in glue, lay the artwork down and press firmly. Try to press out any wrinkles or puckers to the best of your ability.

After the artwork was as smooth as possible, we flipped it over (lining the island with parchment paper or waxed paper first so that it wouldn't stick to the island) we loaded it up with magazines to ensure solid pressure. We left it like this overnight to make sure it was really dry.

Once it was thoroughly dry, we removed the magazines. next, we glued the sides and the back and wrapped the artwork around the canvas. (note: you don't have to do this. you could trim the artwork to the exact size of the canvas if you wish. you could also paint the sides a coordinating color.... If you choose this option i would suggest painting the sides before applying the artwork for a nice finished edge.)

When wrapping the paper around the canvas i folded the corners as if I was wrapping a present. We then flipped it over onto the parchment paper again so that the back was now facing down. This ensured that the artwork would not pull away from the back. again, we left it to dry overnight.

Because I felt the artwork was a little too small for the space on it’s own, I painted a large rectangle on the wall with a coordinating color that is found on the other side of our kitchen. When everything was completely dry, we hung it up over the bar. Voila!
The little dude created a piece of artwork in pre-school last year that I really loved. It's green and orange which happen to match the colors of our kitchen. The photos don't do it justice. i wanted to preserve this piece of artwork to display it over our eating bar area. I thought i'd share with you how we did it in case you'd like to do the same! please note that this can be done with any artwork and is a great alternative to framing a large piece of art like this one.
Here's the piece of artwork in question. as you can see it was done on really thin paper. Being that it was a watercolor type painting, it was very wrinkly. the one thing to keep in mind is that with thin paper like this, it will most likely get very wrinkly when applied to the canvas. If you're not ok with this, then this might not be the right solution for your piece of art. the nicer or thicker the paper, the less chance of wrinkling.
I started out by buying a canvas that would fit the particular painting. there wasn't a perfect size, but this one came pretty close. we only had to trim a small bit off the top of the artwork. (which was fine by me because his teachers wrote his name on the front of the painting! tsk, tsk!) I also bought mod podge (other glues/sealers will work as well), a small roller and tray. then we were ready to start.

One of the best things about this project is that it’s very simple to do, so it’s something the kids can join in on. it makes it more special when they see their artwork hanging, knowing that they helped.
Here's my son, Finley, rolling on the glue with his mini roller. You want to make sure you have a good thick layer of glue so it sticks well. once you have it covered in glue, lay the artwork down and press firmly. Try to press out any wrinkles or puckers to the best of your ability.

After the artwork was as smooth as possible, we flipped it over (lining the island with parchment paper or waxed paper first so that it wouldn't stick to the island) we loaded it up with magazines to ensure solid pressure. We left it like this overnight to make sure it was really dry.

Once it was thoroughly dry, we removed the magazines. next, we glued the sides and the back and wrapped the artwork around the canvas. (note: you don't have to do this. you could trim the artwork to the exact size of the canvas if you wish. you could also paint the sides a coordinating color.... If you choose this option i would suggest painting the sides before applying the artwork for a nice finished edge.)

When wrapping the paper around the canvas i folded the corners as if I was wrapping a present. We then flipped it over onto the parchment paper again so that the back was now facing down. This ensured that the artwork would not pull away from the back. again, we left it to dry overnight.

Because I felt the artwork was a little too small for the space on it’s own, I painted a large rectangle on the wall with a coordinating color that is found on the other side of our kitchen. When everything was completely dry, we hung it up over the bar. Voila!
Wednesday, March 25, 2009
Designing Moms: Meet Lori
Lori is a fellow stationery designer whom I always love catching up with whenever we do our shows in NY. She always has just the right touch or embellishment to her amazing cards and her warmth and whimsy are truly evident in her work. I am so happy to introduce her to all of you and can't wait to see all of the fun things she's been doing with her two adorable boys!


About me: I’m the mother of 2 amazing little boys: Finley (Fin), age 4, and Rowan (Roe), who just turned 18 months. of course I think they’re the most amazing and brilliant boys on the face of the earth.

What I do: I'm a graphic designer turned stationery designer. After designing my wedding invitations in the summer of 2001 I decided that paper was where I needed to be! I started Marzipan inc. shortly after and worked nights and weekends for several years. I finally quit my day job with a design firm to run my business full-time in January 2004.

At Marzipan inc. our main focus is clever, hand-embellished greeting cards....think glitter, beads, rhinestones used judiciously for a subtle finish.

Last fall I launched a new photo correspondence division named Fin+Roe, after my boys. There I offer clean, modern photo cards full of color and pattern for all occasions.
What inspires me: In this day of technology i get a lot of my inspiration from the internet. The number of blogs i follow are a little out of control. Since I live in a small town in Wisconsin I don’t have a lot of great retail outlets to be inspired by, so I rely heavily on my computer. I’m super inspired by color, line, pattern, & photography.

A day in my life: My days are a mix between being a mommy, a designer, a business woman, an accountant, and everything in between. No two days are ever the same. Running a business while raising 2 boys is definitely a challenge, but at the end of the day I wouldn’t have it any other way!
I’m so excited to be a part of such a fantastic group of women and look forward to many posts to come!


About me: I’m the mother of 2 amazing little boys: Finley (Fin), age 4, and Rowan (Roe), who just turned 18 months. of course I think they’re the most amazing and brilliant boys on the face of the earth.

What I do: I'm a graphic designer turned stationery designer. After designing my wedding invitations in the summer of 2001 I decided that paper was where I needed to be! I started Marzipan inc. shortly after and worked nights and weekends for several years. I finally quit my day job with a design firm to run my business full-time in January 2004.

At Marzipan inc. our main focus is clever, hand-embellished greeting cards....think glitter, beads, rhinestones used judiciously for a subtle finish.

Last fall I launched a new photo correspondence division named Fin+Roe, after my boys. There I offer clean, modern photo cards full of color and pattern for all occasions.
What inspires me: In this day of technology i get a lot of my inspiration from the internet. The number of blogs i follow are a little out of control. Since I live in a small town in Wisconsin I don’t have a lot of great retail outlets to be inspired by, so I rely heavily on my computer. I’m super inspired by color, line, pattern, & photography.

A day in my life: My days are a mix between being a mommy, a designer, a business woman, an accountant, and everything in between. No two days are ever the same. Running a business while raising 2 boys is definitely a challenge, but at the end of the day I wouldn’t have it any other way!
I’m so excited to be a part of such a fantastic group of women and look forward to many posts to come!
Labels:
Designing Moms,
Lori
Subscribe to:
Posts (Atom)